Storing personal documents in the cloud always raises the question of whether they are really secure - there are many who do not store them over there and prefer to continue to store locally - single drive method (the bulk of users), or Network Attached Storage (NAS).
It is almost the same fashion with backup.
Then there are those who don't really bother much with security and simply rely on services they think that are reputable and reliant. Others would pay for upgraded/premium services.
What if there is a way to store encrypted documents in the cloud with a peace of mind, and free? Seamless, that is, not "primitive" way of encrypting the files first and then upload?
To begin, let's talk about normal storage in the cloud - for this I will use TeraBox. TeraBox has recently gotten some publicity (here's one) and is gaining popularity with those hungry for free and large space. TeraBox also, like Google Drive and all, provides drive mapping i.e. creating a folder that syncs with the cloud, or simply uploads to it just by copying/saving the document into the folder without using the browser to upload it.
01 Setting up a mapped drive in TeraBox
 |
| Figure 1 |
After setting up the desktop application (above is for Windows environment), click Back up to start the process.
 |
| Figure 2 |
Select the folder on your PC to map to TeraBox cloud - it is better to create the folder first - mine is simply labeled 'TeraBox vault'.
 |
| Figure 3 |
Click Back up now - then, at your desktop, copy some files into the folder.
 |
| Figure 4 |
To see the upload in action in TeraBox app - click View backup progress link.
Your files are automatically backed up. That's TeraBox's automated backup feature. The rest of the steps are pretty standard.
Note: You may notice TeraBox's limit of 5 Gb of traffic per month!
So far, the backup is done for unencrypted files. To back up encrypted files, you need an encryption tool - I use Cryptomator as it is free (desktop version) and I can create multiple folders.
02 Setting up encrypted folder using Cryptormator
Cryptomator by far is my preferred choice for file encryption, both on desktop and online.
 |
| Figure 5 |
Install Cryptomator for Windows and launch it. You will come to the main window. Click Add Vault to set up your first vault. In the Add Vault box, select Create New Vault.
 |
| Figure 6 |
Navigate to the mapped drive created in step 01 above. The name that you choose for your encrypted folder (vault) - Cryptomator will create it as a subfolder of the mapped folder. You will need to assign a password.
I already have a vault folder labeled 'TeraBox' set up earlier in the mapped folder created in step 01 above and created a second one - 'test'.
 |
| Figure 7 |
Once you have created the folder, and after a couple more of configurations, in the Add Vault box, click Unlock Now.
 |
| Figure 8 |
Continue on to unlock it then finally click Reveal Drive - File Explorer will open up the drive which is a virtual drive. Important: You need to reveal drive (and not stop at 'unlock') so that you can access it.
 |
| Figure 9 |
The virtual drive is created to reveal the encrypted folder - vault; in my case, it is drive F: - it is assigned automatically by Cryptomator basing on what (unused drive letter) is available on your system - you can manually change it in the settings later. Each time a new drive/vault is created the WELCOME.rtf is provided - read it.
In the vault (Figure 9 above), you can see that drive F: is unlocked (i.e. open for use).
When comes to encrypting files, there are two methods:
- Directly use the vault (in mapped folder) you have created and use it as your working documents folder.
- Copy from your working documents folders to the vault.
I would recommend you use method #2 and not #1. Why? If you use method #1 and in case something goes wrong and you are not able to unlock the folder (vault) for whatever reason, you may have to re-setup Cryptomator (instead of creating a new vault, you open your existing vault - more on this below); and method #1 would have been a hassle if you wanted to quickly retrieve or to work on the documents because they are encrypted and also not accessible.
Important: In case you encounter the above issue, the guide below on Open Existing Vault will help you to recover your vault; else you can skip them.
 |
| Figure 10 |
Remember you placed your documents in F:? This is the virtual drive that points to the actual location of the encrypted files - which you have already created in step 01 above (see Figure 2). When you go into the TeraBox folder (in my case is I:\Terabox vault\TeraBox), you will see a bunch of unfamiliar files - but rest assured your documents are not lost but are encrypted - you just need to open your vault to access them.
At Cryptomator main box, click Add Vault at bottom left. At the Add Vault box, select Open Existing Vault.
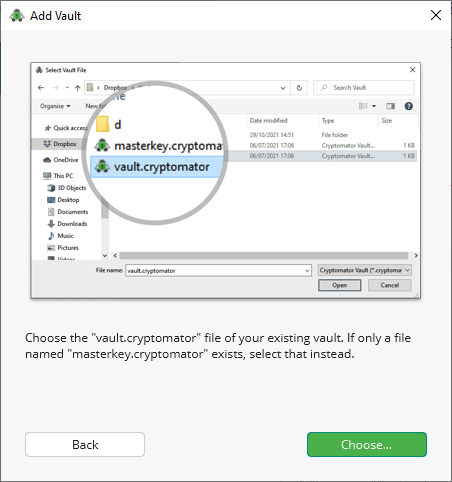 |
| Figure 11 |
Back to method #2. By using this method, your original documents are intact in the usual folders and you can retrieve them easily as before. Note that this method involves 'duplicating' those files that you want encrypted and stored on TeraBox cloud - for added protection!
You can set up Cryptomator to use on your favourite storage or backup site where they offer automated sync/backup service - this so that you can store or back up documents seamlessly into the drive and the encryption is done and uploaded/backed up to the cloud automatically. Years back, I used to winrar them before uploading to cloud for storage/backup!
Basically, that's all to it.
03 Some notes and practical tips on the above
- On method #2 - copying unencrypted, original documents to Cryptomator vault - this process can be automated/scheduled with a syncing tool such as FreeFileSync. All you need to do is work on the main working folder as usual and and the vault is automatically synced and it goes on all the way to cloud fully encrypted.
- But the main working folder is not encrypted? It can be - by using tools such as BitLocker that comes with Windows (depending on version) or third party software like Veracrypt. You can even have the data files stored on an external drive and detach it after working on them. Hint: The precious data files are now "off the grid"!
- How do you know they are encrypted? On your local drive - they are located in the vault - in above setup, it is inside the mapped folder to TeraBox cloud - you cannot make up what files they are (obfuscated) so you have to use Cryptomator to first unlock and reveal the vault via virtual drive as explained above - and use that drive to keep your documents; on cloud - if you use the TeraBox app or browser - the contents will be exactly the same as the vault folder on your local drive - the cloud is the mirror of your local drive.
- Cryptomator encryption also encrypts the filename (not just contents) so you are not able to tell which document it is vs unencrypted e.g. "bank accounts list"!
Follow Cryptomator in Facebook.